University Network
Wireless LAN (Wi-Fi)
Overview
In major common spaces and student lounges in Saitama University, you can connect your laptop to the network wirelessly.
Please note that initial setup is required before use. Please obtain the manual in advance at home or elsewhere.
Supported OS & Standards
We support Windows 11, Windows 10 (Windows 8.1, Windows 7, etc. are not recommended).
We also provide information as far as possible for connections via MacOSX and smartphones. Please refer to the document below.
The wireless LAN standard is compatible with 802.11b/g/n.
Eligibility
Students and staff with a "university-wide unified authentication account" can use it.
However, those who are in certain conditions, such as taking a leave of absence, will be suspended from using it.
Cost
There is no cost burden on the user.
Usage Guide
In the university, wireless LAN access points are installed in various common spaces, including the student union building (near Lawson) and student cafeteria. You can connect in the same way anywhere within visual range of an access point.
Please refer to the manual below for settings and usage.
Resources, Manuals, etc
Wireless LAN Connection Settings Manual
Others
FAQ
【Windows 10/11】
To delete the wireless LAN settings (profile), please follow the steps below.
- Click on the "Start" button then "Settings".
- Click on "Network & Internet".
- Click on "Wi-Fi".
- Click on "Manage Known Networks" or "Manage Wi-Fi settings".
- From "Manage Known Networks", find the target profile (SSID) and click "Delete".
【Windows 8.1】
In Windows 8.1, the [Manage Wireless Networks] menu has been removed.
Therefore, you will delete it by one of the following methods.
■ If the target wireless LAN is displayed in the list
1. Display the list of wireless LANs.
2. Right-click the target wireless LAN from the list and click "Delete".
■ If the target wireless LAN is not displayed in the list
1. Open the command prompt.
2. Type netsh wlan show profile and press Enter. The list of configured wireless LANs (profiles) will be displayed as shown in the figure.
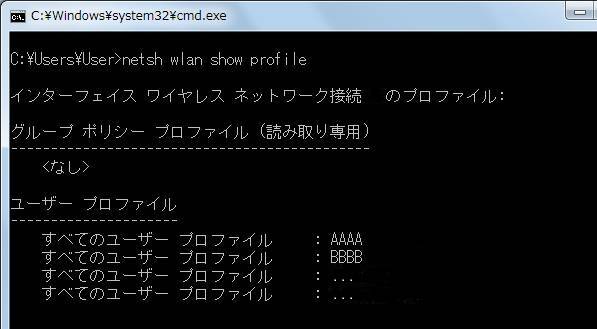
3. For example, if you want to delete the profile AAAA, you can delete it by typing netsh wlan delete profile name="AAAA" and pressing Enter.
You can learn more about how to use it at https://support.microsoft.com/ja-jp/help/2805355/how-to-change-a-specific-wi-fi-setting-in-windows-8 and so on.